Showing posts with label Pies and Tarts. Show all posts

Monday, April 7, 2014

Berry Apple Crumble Pie

Pin It
Pie has always been my first choice when it comes to dessert! There's something about decadent and delicious fillings encased in buttery pastry that appeals to me like nothing else. And when I make pie, I always overeat. Which is why I don't make them often. 

This pie was born of nagging. My four year-old was fixated on making this pie ever since she heard me mention to my husband that 'these blueberries would make an awesome pie'. And since that day, I heard the words 'strawberry blueberry pie' at least 10 times a day. Well, it worked! The pie got made. And it got eaten. The pie lasted only a few hours. That's how much we loved it.

This is kinda a long recipe, but the process isn't long. The crust takes the longest to make, but of course, if you wanted to skip that, you could just use a ready-made pie crust, if available. I prefer to make mine at home because I want it to be all-butter. 

Berry Apple Crumble Pie
Recipe Source: Crust & Crumble: Allrecipes.come, Filling: The voices in my head
Ingredients
Pie Crust 
250g (2 cups) all purpose flour
1/2 tsp salt
2 tbsp granulated sugar
180g (3/4 cup) cold unsalted butter, cut into 1/2 inch cubes 
1 Egg yolk (optional)
Iced water, as needed

Pie Filling
5 cups mixed berries (I used 2 cups each of frozen blueberries and fresh strawberries, and 1 cup of frozen raspberries)
1 Granny Smith Apple, peeled, cored and chopped 
Zest of 1 orange 
1 tbsp orange juice
4 tbsp cornstarch 
1/2 - 3/4 cup granulated sugar, depending on how sweet your berries are (I used 3/4 cup)
1 tablespoon cold unsalted butter

Crumble topping

1/4 cup cold unsalted butter
1/2 cup rolled oats
1/3 cup all purpose flour
1/3 cup light brown sugar
1/4 cup chopped walnuts (optional) 1/4 tsp salt
1 tsp ground cinnamon

Method

For the pie crust  
1. If making in a food processor, add all the ingredients except the water into the processor and pulse until you achieve breadcrumb-like texture.
2. Transfer to a bowl or your counter and add a couple of tablespoons of ice cold water and form the dough.
3. If making the crust by hand, mix the flour, salt and sugar together in a large bowl.
4. Add the pieces of butter and mix into the flour using only your fingertips, until the mixture looks like breadcrumbs.
5. Add the egg yolk and 2 tablespoon of water and mix lightly until incorporated.

6. Add more water, 1 tablespoon at a time until the dough just starts to come together. (I needed only 3-4 tbsp of water in all.) Do not over-work the dough.
6. Shape into a thick disc and wrap in clingfilm.
7. Refrigerate for at least 30 minutes before rolling out and lining your pie tin. Once the crust is in the tin, prick all over with a fork.
8. Preheat the oven to 200.
9. Line the pie crust with baking parchment or aluminum foil, fill with baking beans or uncooked rice, and bake for about 10 minutes until set.
10. Take the crust out of the oven, remove the beans and foil, and brush the inside of the crust - bottom and sides - with the egg white.
11. Bake for 2-3 more minutes.


For the pie filling 
1) Combine the berries, chopped apple, orange zest, orange juice, cornstarch and sugar in a large bowl. Mix gently until well combined.  Do this when you're almost ready to bake.

For the crumble topping 
1) Combine all the ingredients and mix using just your finger tips until you have a crumbly mixture. You don't want to knead it. Chill until you're ready to use.

Assembly
1) Roll out the dough for the pie crust on a well floured surface using a floured rolling pin, and line your 9 inch pastry tin. Chill until you're ready to bake. Reserve the remaining dough for decorating the pie.
2) Pour the filling into the prepared pie tin. Spread evenly in the pie tin.  
3) Break up the chilled butter with your fingers and dot around the pie.
4) Sprinkle the crumble mixture evenly over the surface of the pie. 
5) Decorate the surface of the pie with the remaining pie dough.
6) Bake in an oven preheated to 180C/350F until your pastry is golden and your filling is bubbling and thick - almost 'jam-like'. This takes about 45-60 minutes.
7) Remove from the oven and allow to cool for 1-3 hours. This allows the filling to set properly.
8) Serve at room temperature with whipped cream or with your favorite vanilla bean ice cream. I like eating it as is!

I personally like to use the egg yolk in my pie crust. I feel it adds a lovely rich flavor to the crust. But I have made it without the egg yolk and it is still awesome. If you want to save time, the blind baking of the pie crust could be avoided, but this step ensures your crust doesn't get soggy from the filling juices. 

This pie was such a hit! Everyone loved it - even my super fussy one year old. But with such amazing berries and real butter every step of the way, how could it not be absolutely delicious?! :)


Until next time... <3 
Pin It

Monday, April 30, 2012

Christina Tosi's Crack Pie & Awards

Pin It
Have you missed me?

It's been a while, but I am back (with an extra-long post). It has been a crazy few weeks, and I really thought that I might have to give up blogging somewhere in between. No hasty decisions were made, and for now, I am here to stay. :)

Today, I am back with a recipe that's really popular right now - Christina Tosi's Crack Pie. I wanted to see what all the hype was about, now, post-crack (not the drug kind - please be smart and don't do drugs!), I am here to share my experiences.
Before we get into the recipe though, I must issue the following warnings. IMHO, this pie must be made ONLY under the following circumstances -

1. You have a LOT of people coming over.
2. You have supernatural self-control.
3. You are desperately skinny and need to gain weight rapidly.

Seriously. I was warned, and I didn't listen, and ended up eating half this pie by myself (and sharing the remaining 50% very grudgingly).
In case I haven't made myself clear enough, I LOVED this pie, and I think Christina Tosi is a genius.

As you can see, I made only half the recipe - which makes 2  10-inch pies. I made 1 9 inch pie and increased the cooking time a little, as recommended by the L.A. Times.. I am so glad I decided to go with only half. Who knows how much I would have eaten if I had made the whole recipe!


Christina Tosi's Crack Pie
Recipe from the L.A. Times, who adapted it from the Momofuku Milk Bar Cookbook

Ingredients - Cookie for crust
1/3 cup plus 1 tablespoon (3 ounces) flour
A large pinch of baking powder
A large pinch of baking soda
1/8 teaspoon salt
1/4 cup softened butter
1 1/4 oz (1/6  cup) light brown sugar
1 1/2 tablespoons sugar
1/2 an egg
Scant 1/2 cup rolled oats

Method
1. Heat the oven to 375 degrees.
2. In a medium bowl, sift together the flour, baking powder, baking soda and salt.
3. In another bowl, beat the butter and the sugars until fluffy and light.
4. Whisk in the egg and mix well until completely incorporated.
5. With the mixer running, add the flour mixture, a little at a time, until fully combined. 
5. Stir in the oats and stir to combine.
6. Spread the mixture onto a 9-inch-by-13-inch baking sheet and bake until golden brown and set. 
7. Remove from heat and cool to the touch on a rack. Crumble the cooled cookie to use in the crust.
Don't you love the giant cookie? I couldn't resist taking a small bite!

Making the Crust
Crumbled cookie for crust
1/8 cup butter
1 3/4 tsp brown sugar
A large pinch of salt

Method
1. Combine all the ingredients in a blender or food processor and pulse a few times until blended.
2. Press the crust into a 9 or 10 inch pie tin to form a thin, even layer along the bottom and sides. Set aside.

Ingredients - Filling
3/4 cup sugar
1/3 cup + 1 1/2 tbsp light brown sugar
1/8 teaspoon salt
1/6 cup plus 1/2 teaspoon milk powder
1/2 cup butter, melted
1/3 cup plus a scant tablespoon heavy cream
1/2 teaspoon vanilla extract
4 egg yolks
Prepared crust
Powdered sugar, garnish

Method
1. Heat the oven to 350/180.
2. In a large bowl, whisk together the sugars, salt and milk powder. 
3. Whisk in the melted butter, followed by the heavy cream and vanilla.
3. Gently whisk in the egg yolks, being careful not to add too much air.
4. Pour the filling into the prepared pie crust.
5. Bake the pie for 15 minutes, then reduce the heat to 325/160 and bake until the filling is slightly jiggly and golden brown on top (similar to a pecan pie), about 10 minutes (15 minutes if you are using a 9-inch tin). Remove the pie and cool on a rack.
6. Refrigerate the cooled pies until well chilled. 

It is a lot work, this pie, but SO worth it. The cookie crust needs to be made from the cookie recipe that is a part of this recipe, and not just any generic cookie. The amount of salt in the crust perfectly balances out the sweetness of the filling.
And the filling, - oh the filling - the filling is amazing. Buttery, creamy, butterscotch-y, sugary sweet brilliance.

Obviously, as the recipe says, it is meant to be served chilled. I tried it FOUR ways - it is lovely eaten slightly warm, it is great at room temperature, it is awesome chilled and it is fabulous frozen! In the picture below, you can see how ooey and gooey it is at room temperature.
At the end of this, here is my reasoning as to why this is called 'Crack Pie'.

1. I have not tried crack ever, but I am sure this pie is better.
2. It is addictive.
3. You are not willing to share it with ANYONE.
4. It gives you a high - a sugar high, that is!
5. You have withdrawal symptoms when the pie is all gone! :(
6. After the high, you have some serious lows.

I think my low lasted 2 weeks. Hence, the lack of posts.

I blame it on the pie & on Christina Tosi.

So there!

Here's my message for today - don't do drugs, make this pie!

Now, onto some important stuff that I have put off forever! Some awards :)

First up, a BIG (and very belated) thanks to Manu of Manu's Menu! If you haven't heard of Manu's blog, you seriously have been missing out! Please go visit her. Now!!!

Thanks to Manu for this award! Big hugs, Manu! <3

Second, thanks to Ruchira of The Great Cookaroo, for these two awards!


I met Ruchira through a Foodie Exchange just recently, and you will be seeing more of her on my blog soon, when I reveal what we exchanged! But in the meanwhile, go check out her site and do tell her I said hello!

Both bloggers asked me to share things about myself, and so here are some little known facts about The Harried Cook.

1. I was (emphasize WAS), a sportsperson - a swimmer to be more specific. I won a few medals here and there, represented my state and won a national medal too. Seems like ages ago, in another lifetime. I wrote it here today, just so I don't forget it myself.
2. I am a singer. I am in a band - though we're all very busy these days with kids and other stuff we're working on! But we do perform once in a while and have recorded on a few compilation albums too. I sing almost every week in church though.
3. I was a BIG nerd in school & college. Always did well in my exams. I still kinda like exams. Yes. You read right. Please don't un-like me on Facebook!
4. Before I became a mom, blogger and baker, I too was a stooge in the corporate world. Worked long hours, complained about my boss and all that jazz. That's one part of my life I don't miss!
5. I almost went to Paris to study cooking after I finished school. Long story, but it didn't happen, and things still worked out.

In other news, The Harried Cook is doing well. The baking workshop went very well, and was covered by a friend who is a very popular blogger in the city. You can read about the workshop and see some lovely pictures HERE.

The baking is going well! I've been making cupcakes, tarts, muffins, breads and a whole lot of stuff and it's been a blast! If you are in Chennai, and need to order something, write to me at marsha@theharriedcook.com

That's all from me for now, folks! Posting may not be very regular, but I am still around. Keep in touch!
Pin It

Friday, February 17, 2012

Spinach & Bacon Quiche

Pin It
After that marathon blogging session with my Red Velvet Series, I thought it would be a good idea to take a small break from the sweet stuff. Not a long break, mind you! And I thought it would be good idea to show that we don't just live on desserts and sweet treats around here. We eat other stuff too. Like this.
I found some beautiful fresh spinach at the supermarket the other day, and for some reason, my daughter was intent on loading up our cart with nothing but spinach! We left the store with more spinach than we usually buy, and so I decided I would try something new.
This quiche was adapted from Paula Deen's recipe on the Food Network, and it turned out really great. Of course, how bad can it be when it has bacon, right? I adapted the quantities a little because a 9" tart sounded like too much for our family. I made a 6"  tart and we still had some left over.

Spinach-Bacon Quiche
Adapted from Paula Deen
Ingredients
Crust
1 cup all purpose flour
1/2 cup cold unsalted butter, cut into cubes
1/2 tsp salt
1/2 tbsp ground pepper
1 egg yolk, cold

Filling
1 1/2 cup spinach leaves, chopped
200g cooked bacon, chopped
4 eggs
1 cup heavy cream
1 cup cheese, shredded (I used a mix of cheddar, parmesan and mozzarella)
Salt and Pepper, to taste

Method
1. To make the crust, in a large bowl, stir together the flour, salt and pepper.
2. Add the butter cubes, and with the tips of your fingers, rub the butter into the flour until you have a mixture that resembles coarse bread crumbs.
3. In a small bowl, lightly beat the egg yolk and add into the bowl. Bring the dough together lightly with your finger tips taking care not to knead. If needed, add a few drops of cold water.
4. Wrap the dough in cling film and refrigerate for 20 minutes.
5. Roll out and line your pastry tin with the dough and prick all over with a fork.
6. To make the filling, combine the eggs, cream, salt and pepper and whisk until combined, or whiz for about 30 seconds in a blender.
7. Into the pie crust, layer the spinach, bacon and cheese.
8. Pour the egg-cream mixture over the layers in the crust.
9. Bake at 200 for about 45 minutes or until the center is set and the top is golden brown.
10. Allow to cool for about 10 minutes before slicing into wedges.
For this tart, I made the crust, but a store-bought crust (refrigerated all-butter, NOT pre-baked), would work just as fine, and would be a lot quicker.

This is a really rich and filling quiche and everyone was happy with it. It was just cheesy enough for my daughter and she loved it. I made a simple salad to serve on the side, but my husband and daughter (who are not salad people), enjoyed eating just the quiche for lunch.
I hope everyone is having a lovely week! :)
Pin It

Tuesday, February 7, 2012

Guest Post: Mango, Orange and Ginger Tarte Tatin from Jill Colonna

Pin It
Today is my birthday! I have never been big on celebrating my birthdays. I love planning surprises for others, but hate being surprised myself. So year after year, I am extra cautious and even a little sneaky, and try to detect surprise plans so I can ruin them. Yes, I know! I am horrible. But this year, my very clever friends, along with my sneaky husband managed to surprise me by throwing me a party two days before my birthday! Devious, I say! I didn't have a clue what was happening and walked right into it! I ended up having a nice time with everyone, and even had a lovely homemade birthday cake baked my friend who knows exactly what I like. A yummy butter cake with fresh strawberry glaze and more fresh strawberries on top. She was so embarrassed that the cake had a small 'accident' and cracked down the middle, but I didn't care! It was so yummy! She is such a good cook and baker, that I think she should consider blogging too - just to share her gorgeous recipes with the world!
Homemade cake is the best kind, isn't it? :)

Congrats to my husband, and all my friends for managing to pull this one off! :) Oh - and thanks, too! Then, last night at midnight, I was woken up to find another bunch of friends from church hiding in the dark waiting to surprise me with a cake. I was very touched that they took the time and effort to come at that part of the night in the cold. Very sweet! I am truly blessed to have so many wonderful people in my life. I pray to God that I never forget that. And that I never stop being thankful.

This year, I resolved that I would celebrate my birthday on my blog with all my new friends. God has been exceedingly good to me, and I thank God for adding another year to my life.

As I mentioned in my earlier post, this month is also my blog's birthday, and I cannot believe that a year has flown by already. The best part of starting this blog has been the wonderful friends I've made since I've started, and one of the best friends I have made in the blogosphere is the wonderful Jill Colonna. She is one of the nicest, funniest, most genuine people I have had the honor of meeting. She has been so supportive through some tough and challenging times I faced this year. I am so grateful for Jill! She's awesome. And I don't have to tell any of you what a fabulous writer, musician, cook, baker, blogger, wife, mom and all-round champ she is! Undoubtedly the Queen of Macarons, her blog on the Mad about Macarons website also features many more amazing, mouth watering recipes from Jill's kitchen. I still can't believe I'm friends with a celebrity and best-selling author! :)

It is totally an honor for me to have Jill guest-posting on my blog for my birthday! I am so honored! She has made something totally amazing, and I think I will stop rambling and let Jill take over. Ladies and gentlemen, Jill Colonna! :)

Mango, Orange and Ginger Tarte Tatin: Guest Post by Jill Colonna of Mad about Macarons
Tatin! Joyeux Anniversaire from Paris, Marsha! 


I just couldn't make this tarte big enough for my lovely friend, Marsha. You see, it's her birthday. It's also her first blogoversary approaching this month, and shehas given me the total honour of being a guest on The Harried Cook, to join her birthday celebrations.


Marsha is the sweetest blogger I've virtually met. She's adorable (I'm saying that with a French accent, so imagine it as adorrrraaaaable, with a rolled 'R'- it sounds so much better) and fun. Can you imagine her lucky husband and daughter, sampling her latest creations such as honey and sesame bread, and lemon-lime meringue pie (another great egg yolk recipe!) Speaking of which, do you remember her Mad About Macarons guest post to use up these egg yolks with that incredible Strawberries and Cream Mousse Pie, using a Pâte à Bombe method? Marsha  says she's harried, but I admire how she juggles her job and home life, plus manages to fit in moving house like a warm Indian breeze.
What is this for a birthday cake, you ask? Well, in our house we don't really eat cake.We eat macarons... and right now we're eating so many tarte tatins. It's the season, as the humble apple is the basis of the classic French Tarte Tatin. It's our winter version of eating the recommended daily portions of fruit. I guess it's healthy, even if there is a touch of butter and sugar - just to carmelise it, you understand.


When I was newly married, my French Mother-in-Law would produce the most sumptuous Tarte Tatin for dessert. I was in awe. It sounded grand and looked complicated. How could I possibly return home and make this for Antoine without goofing up? She had given me the recipe and told me it was dead easy. Hey, am I supposed to believe everything she tells me? So, I went home and made anything but Tarte Tatin since I had no courage. Then one day I saw it in a French magazine and saw how quick it was to make. A no-brainer. That's me. That's my Tarte Tatin. It's the same syndrome as macaron-making, don't you think? Picture Julie Andrews singing, "I have confidence in me"!


The Tatin sisters, who ran a restaurant at the start of last century in the Sologne region, gave the dessert its name. The story goes that as the apples were cooking they realised they'd forgotten the pastry, so they simply stuffed the pastry on top then flipped the tart upside down and Mon Dieu, look what turned up?
For Marsha's Tarte Tatin, I picked mangoes, as they're now appearing on our market stalls, although Marsha quite rightly told me the best ones are from India (these ones are from Peru.) And as the oranges are at their best just now, I couldn't resist adding a touch plus a glow of fresh ginger to spice up our present sub-zero temperatures around Paris.


Mango, Orange & Ginger Tarte Tatin Recipe
Preparation Time: 10 minutes
Cooking Time: approx.45 minutes
Ingredients
2 mangoes, firm but sweet
1 tsp orange juice
125g light brown sugar
70g unsalted butter
1 tbsp zest from an untreated orange
1 tsp fresh ginger, grated
1 ready-prepared round of puff pastry
Utensil 
A good non-stick cake pan that can transfer to the oven (I just used a non-stick frying pan with removable handle)
Method
1. Preheat the oven to 180°C.
2. Heat the sugar and butter in a cake pan, adding the teaspoon of orange juice. Peel and cut the mangoes into slices and pack them closely together in the pan. Add the orange zest and the ginger. Cook over a medium heat for about 20 minutes - or until you see a deep golden caramel forming underneath the fruit.
3. Place the round of puff pastry on top of the fruit and tuck it in around the edges of the pan. Prick the pastry and bake in the oven for 25 minutes.
4. Remove from the oven and leave to cool slightly for about 10 minutes. Place a large plate (preferably one that dips slightly in the middle to catch the juices) upside down on the tart and flip it over. Tatin!
Happy Sweet Birthday, Marsha, and congratulations on your first blog anniversary!

There! Didn't I tell you Jill is funny? She is such a sweetheart and that tarte tatin is so amazing looking. I only wish she could send me slice! I can't wait for mango season to get here so I can try this recipe myself!

I love Jill and I highly recommend becoming a regular visitor on her blog, and buying her awesome book if you haven't already done that! Merci, Jill, for being such an awesome friend, and fantastic guest poster!

Tomorrow, we start Red Velvet Fest for Valentine's Day. I've had some hits and some misses with my Red Velvet creations, and I can't wait to share them all with you!
Pin It

Sunday, January 29, 2012

Lemon-Lime Meringue Pie

Pin It
One of the many exciting things for me about this new house we've moved into is our neighbor's lime tree. I shared this picture in this post about my new home, remember?
At first, when I saw the limes just dropping into our yard, I tried my best to return the limes to my neighbors. I tried throwing them back into their yard, lining up the limes on the wall separating our houses, and even just ignoring the limes. But I found they were not very interested in the limes. The limes on the wall just dried up after a few days, and that's when I realized - I might as well put them to good use!

I had friends over for a lazy lunch one afternoon, and this was a really awesome finish to our meal. I must mention - I love pies. Any kind - fruit, custard, meat, nuts - anything but chocolate. Don't hate me. Chocolate overdose just isn't my thing - except if it is chocolate ice cream. Getting back to pies - I love them. This was my first time making a meringue pie, and I was really excited to try it. It turned out great in terms of taste.
The only thing that I was confused about were these weird golden droplets on the top of my meringue. I was really upset by it at first, till one of my guests, who has had her fair share of lemon meringues, assured me that this was a perfectly normal thing to happen to meringue pies sometimes, and that it doesn't affect the taste. Whew! And honestly, I thought it looked kinda pretty. Right?
But of course, I couldn't just let it go. I googled it. And it turns out that meringues weep for many reasons - undercooking, overbeating, letting the curd cool before slathering on the meringue, or simply because the weather is humid.

I'm going to go with the humidity. When in doubt, blame the weather.

And besides, I think this pie was weeping tears of joy.

You could make this recipe easier by using a pre-baked pie crust. I didn't. Also, if you bake the crust yourself, feel free to substitute some of the butter with some shortening if you prefer that.

Lemon-Lime Meringue Pie
Pie Crust
Ingredients
1 1/4 cups all-purpose flour
1 tsp sugar
1/2 tsp salt
8 tbsp unsalted butter, cold & cut into small pieces
1-3 tbsp ice-cold water
1 egg white (for brushing)

Method
1. If making in a food processor, add all the ingredients except the water into the processor and pulse until you achieve breadcrumb-like texture.
2. Transfer to a bowl or your counter and add a tablespoon of ice cold water and form the dough.
3. If making the crust by hand, mix the flour, salt and sugar together in a large bowl.
4. Add the pieces of butter and the shortening and mix into the flour using only your fingertips, until the mixture looks like breadcrumbs.
5. Add the water, 1/2 tablespoon at a time until the dough just starts to come together. (I needed only 1 1/2 tbsp of water.) Do not over-work the dough.
6. Shape into a thick disc and wrap in clingfilm.
7. Refrigerate for at least 30 minutes before rolling out and lining your pie tin. Once the crust is in the tin, prick all over with a fork.
8. Preheat the oven to 200.
9. Line the pie crust with baking parchment or aluminum foil, fill with baking beans or uncooked rice, and bake for about 20 minutes until set.
10. Take the crust out of the oven, remove the beans and foil, and brush the inside of the crust - bottom and sides - with the egg white.
11. Bake for 10 more minutes until golden.

Lemon-Lime Curd Filling
Ingredients
1.5 cups sugar
8 tbsp unsalted butter
3 eggs, lightly beaten
2 egg yolks, lightly beaten
1/2 cup lime juice
1/4 cup lemon juice
3 tsp lime zest

Method
1. Combine lime juice, lemon juice, zest & sugar in a saucepan &  boil until sugar is completely dissolved. Simmer for a further 5 minutes.
2. Add butter and stir until the butter has dissolved completely.
3. Take off the stove and let the mixture come to room temperature.
4. Beat the eggs & egg yolks to the lime mixture & mix well.
5. Return to the heat. Cook over a low heat, stirring constantly until the mixture thickens. It should now coat the back of a spoon. At this point, you can preheat the oven to 200.
6. Strain & fill into the pie crust. Top with meringue while the mixture is still very hot. Meringue recipe is below.
7. Bake for 12-15 minutes or until the top of the meringue is golden.
8. Cool on a wire rack and slice when cool.

Meringue 
Ingredients
4 egg whites
A pinch of cream of tartar
3 tablespoons sugar

Method
1. Using an electric or stand mixer (or your whisking arm), beat the egg whites and cream of tartar until soft peaks form.
2. Add the sugar gradually and continue beating until stiff peaks form.
3. Spread over the lemon-lime curd layer while the curd is still very hot.
I enjoyed the sweet-tart pie a lot. Though I am not a huge fan of meringue in a pie, this was really delicious. But then again, I am a pushover for any dish with lime in it.

I hope you try this recipe, and let me know how it goes! And I hope your meringue doesn't weep... unless you want it to! :)

P.S. - Thanks to the Gecko and the Mouse for taking the pictures of the whole pie! :)

P.P.S. - Tell me - do you have any tips for me to stop my pie from weeping? Apart from moving to less humid climate, that is.


Pin It

Thursday, June 23, 2011

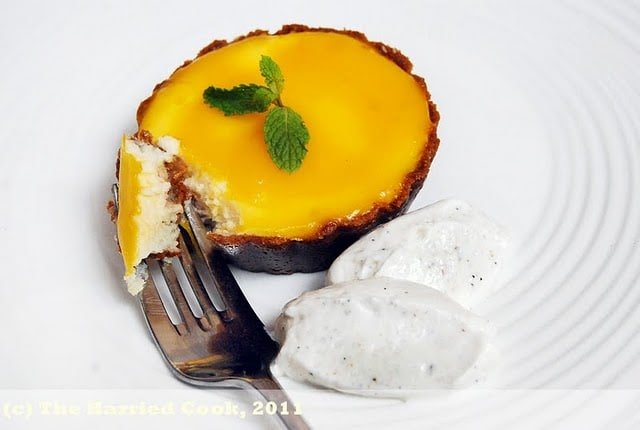
Guest Post: Mango Mascarpone Cheesecake with Cardamom Whipped Cream

Pin It
The Harried Cook is a fairly young blog. Only a few months old. I'm still learning, and have a long way to go! Every blog I visit, I learn something from that talented blogger. One of the first people who visited my blog, and left me a comment, and some really good advice about Foodbuzz, was the wonderful Chef Dennis. His blog is wonderful & he is such an awesome chef! I am so glad that today, I have the opportunity to guest post on his blog "More than a Mount Full". He does some wonderful work among students at The Mount, and is a great help to so many bloggers out there. His 'Ask Chef Dennis' column has taught me SO much, and I know that many people will agree.

When I started my blog four months ago, I had no clue what I was doing. I knew I wanted to chronicle my recipes, but that's about it. I had no idea about all the things that went into a good blog. More importantly, I had not clue about the incredible sense of community that existed among food bloggers. Every single person who has visited my blog, and left a kind word for me has given me the motivation to keep going, and I thank each of you today.

And thank you, Chef Dennis for all the support and for inviting me to guest post on your blog!


On Chef Dennis' blog today, I am sharing my recipe for a Mango Mascarpone Cheesecake with Cardamom Whipped Cream. It is a light, creamy cheesecake with some amazing flavors. You should go check it out on More than a Mount Full, and don't forget to leave Chef Dennis a comment telling him I said 'hello'! :)

This has been my busiest week in a long time. So busy that we have eaten out most of our meals. I haven't spent much time in the kitchen & I miss it! I hope I will be able to get back to it soon. I must apologize to all my blogger friends. I just have not had the time to visit your blogs and read the wonderful posts you have shared this week. My Google Reader is overflowing, and I don't know where to start. But I can't wait to visit and read your posts and yummy recipes soon!

Mango Mascarpone Cheesecake w/ Cardamom Whipped Cream


IngredientsCrust
3oz ginger nut cookies
1/2 cup rolled oats
2 tbsp salted butter
Filling
4oz mascarpone (I used homemade)
4oz cream cheese
1 egg
1/3 cup sugar
½ tsp vanilla
½ tsp lemon juice
A pinch of salt
Mango Gelee
½ cup pureed mango, strained
1 tbsp powdered sugar (more if the mango is sour)
1 tsp lemon juice
1 ½ tsp powdered gelatin
2 tbsp water
Cardamom Whipped Cream
½ cup whipping cream
1 tbsp powdered sugar (or more if desired)
½ tsp vanilla
1/8 tsp fresh cardamom powder


Method
Crust
1.  In a blender or food processor, powder the ginger nut cookies and oats until fine, and transfer
to a bowl.
2.  Pour in the melted butter and stir well to combine.
3.  Divide the mixture among the four mini pie tins,and press into the base and the sides of the
tin.
4.  Refrigerate until required.
Cheesecake Filling
1.  In a large bowl, whip the cream cheese and mascarpone until light and fluffy.
2.  Add the sugar and continue whipping for another minute.
3.  Add the egg. Beat well to incorporate.
4.  Mix in the vanilla, lemon juice, and salt. Whip until evenly blended.
5.  Spoon into the prepared pie crusts, making sure each crust is about ¾ full.
6.  Bake at 350 for 20-25 minutes, until the filling has puffed up slightly and the centers of the
cheesecakes wobble slightly when shaken gently.
7.  Remove from the oven and allow to cool. The cheesecakes will continue to cook and firm up
while cooling.
8.  When completely cool, top with the mango gelee and refrigerate at least 3 hours, until the gelee
has set.
Mango Gelee
1.  In a small bowl, sprinkle the powdered gelatin over the 2 tbsp of water and allow the gelatin to
soften for a few minutes.
In a medium bowl, combine the mango puree, sugar and lemon juice.
2.  Place the bowl with the gelatin in a larger bowl filled with warm water and allow the gelatin to
melt.
3.  Stir the liquid into the mango puree and stir well to combine.
4.  Spoon ¼ of this mango mixture over each cheesecake and refrigerate to set.
Cardamom Whipped Cream
1.  Whip the cream till it forms soft peaks.
2.  Add the vanilla, sugar and cardamom powder and continue to whip for a few minutes until well
combined. Do not over-whip the cream.


Serve the cheesecakes chilled (maybe garnished with a sprig of mint) and spoon some of the cardamom whipped cream alongside each cheesecake.
This cheesecake is really, really creamy because of the mascarpone. The gelee is supposed to be just set, and still creamy and not rubbery or chewy. The mango flavor really comes through. To be completely honest– cardamom is my LEAST favorite spice. And so, I don’t know why I decided to use it in this recipe. It just made sense to me when I thought about it, and I hate to admit it works really well with the mango.


I want to remind you that you still have time to enter my giveaway if you haven't. There are TWO copies of Jill Colonna's amazing book 'Mad about Macarons' to be won! More details on the giveaway post HERE.


GIVEAWAY CLOSED!


Pin It
Real Time Web Analytics